Custom objects
Creating your own objects and fields, beyond companies, contacts, and deals, and managing their records
Updated 2026.10.01
This page covers creating objects specific to your company (agencies, projects, contracts, and so on) in addition to companies, contacts, and deals, and managing their records.
This feature is offered as a trial. It's currently available on all plans. Plan-specific conditions will be set in the future.
Requirements
- Only workspace admins can create and change objects and fields, and set permissions
- A newly created object can only be used by admins. To let members use it, set who can access it on the Permissions tab (see "Set permissions" below)
- A workspace can have up to 20 custom objects. Archived objects and objects deleted within the last 30 days count toward this
- Each object can have up to 30 fields. System fields and archived fields don't count
- There's no limit on the number of records
When you reach a limit, the Create Object and Create field buttons can't be clicked, and a message says the current usage limit has been reached.
Create an object
- Open Settings → Personal → Custom Objects.
- Click Create Object.
- Fill in the three fields below and click Create.
| Field | Rules |
|---|---|
| Display Name (singular) | Up to 50 characters. Must be unique in the workspace |
| Display Name (plural) | Up to 50 characters. Used in the left navigation |
| Slug / Identifier | Must start with a lowercase letter and use only lowercase letters, digits, and underscores (`_`), up to 30 characters. It can't be changed after creation |
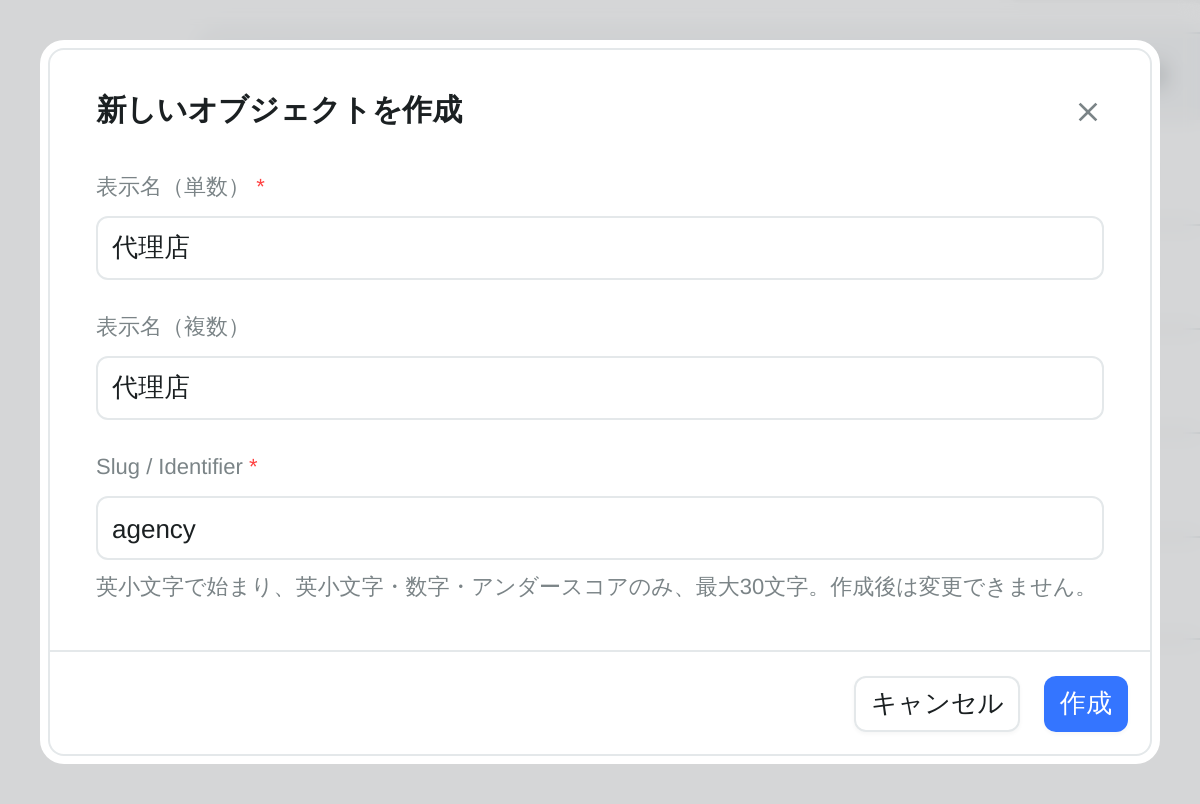
If the display name is in Japanese, the slug isn't filled in automatically, so type it yourself. (Example: 代理店 → `agency`)
A new object automatically gets these system fields: Name (required), record ID, created at, updated at, created by, and updated by.
The new object appears under Records in the left navigation, alongside companies, contacts, and deals.
Edit an object's settings
An object's detail screen has four tabs: Config / Permissions / Appearance / Fields. To change the config (display names), appearance, or fields, first click Edit definition.
- Click Edit definition at the top right of the detail screen.
- Make your changes on each tab.
- Click Apply changes to apply all the changes at once. To cancel, click Discard changes.
- While you're editing, other admins can't edit the same object's definition
- If you stay inactive for a while, the edit session ends and any changes you haven't applied are discarded. Click Continue editing, shown before it ends, to keep going
Archiving, deleting, and setting permissions work without clicking Edit definition.
Create fields
- Click Edit definition, then click Create field on the Fields tab.
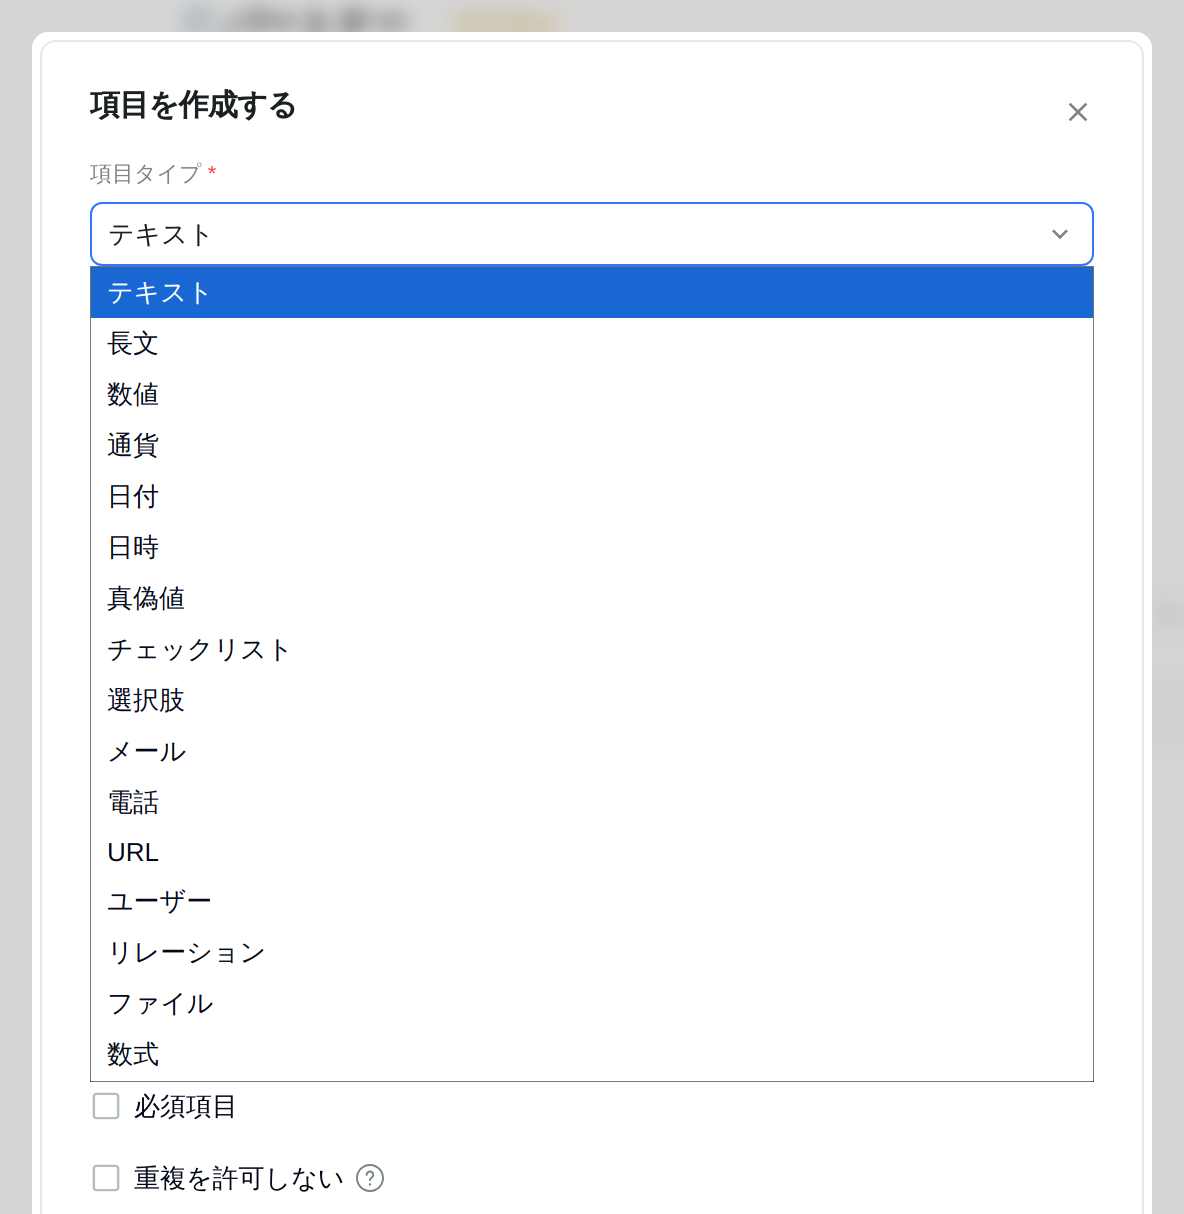
- Choose the field type and name, and set a description, default value, required, and Do not allow duplicates as needed.
- Click Create, then finally click Apply changes.
There are 16 field types. The field type and slug can't be changed after creation.
| Field type | Main settings |
|---|---|
| Text / Long text | Maximum length |
| Number | Minimum, maximum, decimal places, display format (Number / Percent / Rating / Progress / Duration), digit grouping |
| Currency | Currency (JPY by default), decimal places, currency display (Symbol / Code) |
| Date / Date & time | Default value (the creation date, the creation date and time, a fixed date, etc.) |
| Boolean | Default value |
| Checklist | The list of items to check off |
| Select | Options (two or more) and colors. Selections allowed (Single / Multiple) and selection count conditions |
| Email / Phone / URL | For phone, you can set a default country; for URL, how it's displayed |
| User | Links workspace members. Choose one person or multiple (up to 20) |
| Relation | The target object and the relationship type (One to one / Many to one / Many to many) |
| File | Maximum number of files (up to 10), per-file size limit (up to 10 MB), allowed formats |
| Formula | Calculates and shows a value from other fields of the same record. See "About formula fields" below |
- Do not allow duplicates can only be set on Text, Number, Email, Phone, and URL
- Default values can't be set on User, Relation, File, or Checklist
- When you add a field to an object that already has records and set a default value, that value is also filled into the empty field on existing records. The number of affected records is shown before you save (up to 1,000 records can be updated at once)
- You can't add a required field without a default value to an object that already has records. Set a default value, or create it as an optional field, fill in values on the existing records, and then make it required
- Drag fields on the Fields tab to reorder them
Archive or delete fields
- Hide a field you no longer use with Archive, and bring it back later with Restore. Required fields can't be archived
- Delete an archived field with Delete. For 30 days after deletion, you can undo it with Cancel deletion (the restored field stays archived). After 30 days, it's permanently deleted
About relation fields
- The target can be any custom object in the same workspace, or companies, contacts, and deals
- The target and relationship type can't be changed after creation
- Deleting a target record doesn't delete the records that point to it
- A relation is shown on the record that holds the field. It isn't shown on the target record
About formula fields
- Create a formula field while "Edit definition" is not active. Click Create field on the Fields tab to open the formula screen. Formulas can't be created or changed while a definition is being edited
- Choose the output type (Text / Number / Currency / Date / Date & time / Boolean) and a display format, enter the formula, and click Create. Then click Publish to show the calculated value on records
- The calculated value is read-only. When it can't be calculated, "Unable to calculate" is shown
- Formula fields aren't covered by search, filters, sorting, or CSV export, and can't be required or unique
- Deleting a formula field takes effect immediately and can't be undone
Set permissions
On the Permissions tab, set whether members and teams can view and edit this object's records.
| Who | What it sets |
|---|---|
| Workspace access | The default permission for everyone in the workspace |
| Teams | Per-team permissions. They take precedence over the workspace default |
| Individual Members | Per-member permissions. They take precedence over team and workspace permissions |
Choose Admin / Read & Write / Read Only / No Access and click Save.
- If a person is in multiple teams, the stronger permission applies
- Workspace admins can do everything regardless of these settings
- Objects you don't have permission for don't appear in the left navigation
Manage records
Open the object you created from Records in the left navigation.
- Create a record with Add (object name). The input fields match each field type
- On the list you can search, filter, sort, and choose which columns to show
- You can switch between Table and Kanban views. Kanban needs a Select field whose selections allowed is "Single". The kanban is display only; cards can't be dragged between columns
- Filters and sort orders you use often can be saved as views
- From the … menu on the list you can Import CSV and Export CSV. An import takes up to 1,000 rows and 50 columns and only adds new records. CSV headers must match a field's name or slug. An export covers the columns currently shown
- On a record's detail screen, click a value to edit it in place. Use Comments to keep a conversation on the record, and mention members with `@`
If another member updated the same record first, you'll see "Another user updated this record. The latest value is shown; edit it again." Check the latest content shown, then make your edit again.
Deleting records isn't available yet. The Activity, Email, Meeting, Task, and Note sections on the detail screen also show "Currently unavailable".
Change the appearance
On the Appearance tab of the object's detail screen, choose an icon and a color. They're used in the left navigation, chat, and record displays. To change them, click Edit definition first.
- For the icon, upload an image (JPG / PNG / GIF / WebP, up to 5 MB) from Upload a logo or Add custom emoji. Icons you've used before can be picked again from Recently used emojis
- Choose the Icon Color from 8 colors
- Check how it looks in both light and dark in the preview, then click Save
Archive or delete
Open Destructive Actions on the Config tab of the object's detail screen.
| Action | What happens |
|---|---|
| Archive | Records can no longer be viewed or worked on, and the object disappears from the left navigation. Undo with Restore |
| Delete Object | You must type the object's name to confirm. For 30 days after deletion, you can undo it with Restore |
Archived and deleted objects still appear in the list under Settings → Custom Objects. You can filter by status, and deleted objects show the number of days left until they're permanently deleted. You can also undo from Restore in the list.
After 30 days, all data including records is permanently deleted and can't be restored. You can also permanently delete a deleted object right away, without waiting 30 days, with Permanently delete in the list's menu.
Standard objects such as companies, contacts, and deals can't be archived or deleted.
Coming soon
- AI Auto-fill for fields
Even if it appears on screen, it can't be used yet. It'll be added later.